Showing posts with label Birthday Card. Show all posts

Tuesday, June 9, 2020

There's Gnome ONE like YOU! | Whimsy Stamps

Hello Crafty Friends!

Today's card is a scene card using the Gnome Matter What clear stamp set and the sentiment is from the Gnomies! I created this a couple of months ago and I thought I'd share today.


I love that gnomes are trending right now, so I really enjoyed creating this card. I used just this gnome and the the frogs from the stamp set. 


 I stamped the gnome first and masked him off with masking paper then I stamped the frogs. I stamped them on 80# Neenah Solar White cardstock using a Copic safe black ink. I colored the stamped images first with Copic markers.


So for the background I used Copic markers to create the ground and tree. I used light shades of Copic E markers. For the tree trunk I used darker Copic E markers. This was pretty easy to create. For the leaves on the tree I used green Copics in YG67, YG17, YG23, and YG03. I think I kind of got carried away creating the leaves, but I still really like it.

I die cut the panel with the Wonky Stitched Rectangle Die and adhered it to the card base with liquid glue onto a top folding A2 sized top folding card base.

To finish the card I added white highlights with a white Gelly Roll pen. I didn't add anything else to the card because I felt it was enough.

That's my card for today, I hope you like it as much as I do!

Below are affiliate links to the products I used in today's cards.


Wonky Stitched Rectangles Die Set - Whimsy Stamps Gnome Matter What Clear Stamps Gnomies Clear Stamps


Thanks so much for stopping by and have a great day!


Friday, June 5, 2020

Gossip Girls Slimline Cards | Whimsy Stamps June Mini Release

Happy Friday Crafty Friends!


Today I have two slimline cards featuring the brand new Filmstrip Slimline Die and the new Gossip Girls stamp set and coordinating dies!

Both of my slimline card bases are 8 1/2 x 3 1/2, this is the size I always use. Some crafters use different measurements, but that's totally up to you what size you prefer, I just prefer this size because I know it fits perfectly in a #10 business envelope.


For my first card here I only used the lips/mouth from the Gossip Girls stamp set along with the new 6x6 Cosmic paper pack. After creating my slimline card base I die cut the Filmstrip die with 100 lb. cardstock. It's hard to see the details of the die on this card because of the white on white. I used the filmstip die again to cut the Cosmic paper, and adhered all of these die cuts to my card base using liquid glue.
Next I stamped the mouth three times on 80 lb. Neenah Solar white cardstock using Copic safe black ink. After coloring the images I die cut them out with the coordinating dies.
I used the Happy Birthday sentiment from the Adopt Don't Shop Dogs clear stamp set and white heat embossed it onto black cardstock and used my paper trimmer to create a label.


And to complete the card I added shimmer, white highlights with a Gelly Roll pen, and matching enamel dots.


For my second slimline card I die cut the Fimstrip die twice from black cardstock. I used the negative center squares from the first card to stamp my images. I adhered the first filmstrip to the card base with liquid glue. For the second strip I use Scor-tape and adhered it on top of the other. I saved the black and white tiny squares that pop out and adhered those back in place on the strip. Black, white, black, white, etc.


Then the white squares I kept, I stamped the Gossip Girls and one of the sentiments in blue and the mouth in black along with the other two sentiments. I used a very like pink Copic marker to add a little color. I then masked the images with masking tape. I used the little dots from the Twinkle Stencil to add some interest to the background with Worn Lipstick Distress Oxide. I also ink blended around the edges and used liquid glue to adhere them in place.


To complete this card I added shimmer to the colored areas, white highlights with a Gelly Roll pen, and silver star sequins.


And that completes my cards for today! 

Below are affiliate links to the products used.

https://whimsystamps.com/collections/june-2020 **NEW Gossip Girls Clear Stamps - Whimsy Stamps **NEW Gossip Girls Outline Die Set - Whimsy Stamps **NEW Slimline Film Strip Die - Whimsy Stamps Twinkle Stencil Adopt Don't Shop DOGS Clear Stamps - Whimsy Stamps


Thanks so much for stopping by today!


Saturday, March 28, 2020

You're Still a Spring Chicken | Whimsy Stamps

Hello Crafty Friends!

I have a birthday Spring card to share today! I've used the Whimsy Stamps Spring Chickens stamp set and the Spring Ovals Die set along with a little ink blending and Copic coloring! So get ready for some cuteness!


For this card I decided to Copic color my images with #80 Neenah Desert Storm cardstock for something a little different today. I love to Copic color on this cardstock, but rarely do.


After Copic coloring I ran the images through my Brother Scan n Cut machine, then set them aside. I created an A2 sized card base from some #100 Primitive (cream color) cardstock. I love this cardstock because of the flecks in the paper. I used the same cardstock and die cut a few ovals from the Spring Ovals Die Set


I inked up the edges of the ovals and the card base with Antique Linen Distress Ink, I haven't done that in a long time, I still love that look, especially on cardstock that has a vintage look. 

After inking the card, I began to assemble it. I used liquid glue to adhere the ovals one on top of the other, then I adhered the stacked ovals to card base. Then I adhered the tulips and decided to add dimension by using foam tape to pop up the chickens in front of the tulips and then gave them party hats! I love it! 
I stamped the sentiment You're still a Spring chicken on a sentiment die strip and popped it up with foam tape as well.


 I stamped a small chicken on the inside of the card and a sub sentiment that reads well...sort of! That sentiment cracks me up!

I completed the card by adding white highlights and shimmer on the images on the front of the card. I added some pretty white pearls for more interest.

That completes my card today, thanks so much for stopping by!


Wednesday, January 1, 2020

Whimsy Stamps January New Release | Polka Dot Pals Fern


Hello crafty friends!

This is my first design team post for Whimsy Stamps and I couldn't be more excited! I hope you enjoy because today is also their first new release for the New Year!

Today I'm showcasing one of the new Polka Dot Pals, her name is Fern and she is the sweetest, and the new rectangle stitched die called Wonky Stitch, so fun!


For Fern and the flowers I first stamped them out on Neenah #80 lb. cardstock with Memento Tuxedo Black Ink and then cut her out using my Brother Scan and Cut machine. I colored the images using my Copic markers and used a white gel pen to add highlights and interest to my coloring.


For my background and hill I used the Giraffe 6x6 paper pack. I die cut the giraffe print background from the new release Wonky Stitch rectangle die and I used a hill die from my stash for the polka dot hill. I adhered the giraffe patterned paper first and then the hill with liquid glue on an A2 sized notecard and popped Fern up on foam tape along with one of the flowers. I also added a flower to her hair. I die cut Birthday from the same paper pack using the Birthday Word and Shadow die set and used a Happy sentiment stamp from another Whimsy Stamps stamp set, and finished the card by adding matching enamel dots and shimmer with a Nuvo Shimmer Pen.

And that's my card for today, thanks for stopping by!

Affiliate links provided below at no extra cost to you, thank you! 
 Birthday Word and Shadow Die Set 6x6 Paper Pack - Giraffe

Nuvo - Deluxe Adhesive Memento Full-Size Ink Pad - Tuxedo BlackScor-Buddy


Thursday, April 5, 2018

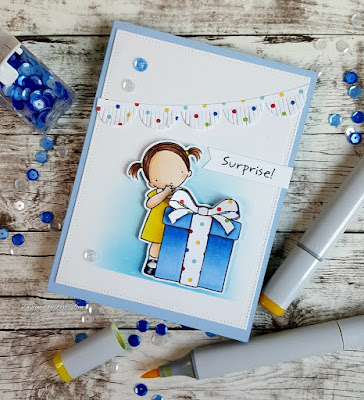
MFT Wednesday Sketch Challenge 379 | Surprise!

Hello everyone!

Today I wanted to play along with the MFTWSC and I also needed a birthday card to send out to one of my friends, so this worked out perfectly! I'm always in need of birthday cards but never seem to have enough on hand.

Here's my card for the challenge.


and here's the sketch.


I started my card by cutting a piece of Bristol Smooth Cardstock with the rectangle die from the MFT Blueprints 1. I masked off the top and bottom with Post-it Labeling Tape and began ink blending with Broken China Distress Ink and  Salty Ocean Distress Ink on top until I got a smooth transition. Then I spritzed a little water on top for that distressed look.

I used the PI Happy Birthday to You stamp set and colored it with Copic markers. I paper pieced the bow and ribbon on the gift using the Birthday Blowout patterned paper from MFT. I stamped and cut an extra bow to place on top for dimension and adhered it with a Zots glue dot, then added Wink of Stella to the gift. I then popped the image up with foam and placed it on my card panel.

With the same patterned paper I die cut a banner from the MFT Scallop borders and adhered it to the top of the card at an angle. I stamped the Surprise sentiment from the same stamp set with the MFT Essential Fishtail Sentiment Strips, adhered it in place and snipped off the excess. 

I adhered the panel to MFT Blue Breeze cardstock and added some Pretty Pink Posh sequins and Stickles to complete my card!

And that's my card for today's challenge, thanks for stopping by!
Lori

Friday, August 25, 2017

It's Your Day | Happy Birthday Card

Hello everyone!
I have a card I created for the Brutus Monroe DT that didn't made to the blog so I thought i would post it here. There are so many cards we make when we first get our stamps as a design team and some just don't make to a post on the Brutus Monroe blog. We just simply run out of weeks.

 I used the Trick or Treat stamp set in different way to create a fun punny birthday card!


Isn't this hilarious! When I first saw the Trick or Treat set and saw the Grim Reaper, I knew I had to create something along these lines! Using the Clickable letter stamps I was able to created my own greeting on the front of the card. The grim reaper originally held a bag in his hand for Halloween candy, I simply masked that off when stamping and added a lantern from another stamp set I had from my stash. The moon on this looks extra spooky, it's from a past release called Lucky Stars.
The fence and hill dies are from Amuse Studios, and the Happy Birthday greeting on the inside of card is from a past Brutus Monroe release called Break the Rules.  
I hope you enjoyed my card.

Thanks so much for stopping by, I have a supply list below where you can shop Brutus Monroe products. Have a great day!

Lori

Click here to shop Brutus Monroe.